
Understanding how RAID 6 survives two simultaneous drive failures — with math, examples, and a visual breakdown.
If you’ve ever managed storage for a server, NAS, or data center, you’ve faced the same dilemma: How do I protect my data without sacrificing too much capacity or performance?
RAID 5 has been the go-to for decades, but it has a fatal flaw — it can only tolerate one drive failure. In an era of 20+ TB drives and massive arrays, the probability of a second drive failing during a rebuild is no longer theoretical. It’s a real risk.
That’s where RAID 6 comes in.
RAID 6 is the only standard RAID level that can survive two simultaneous drive failures while still delivering usable capacity across N+2 drives.
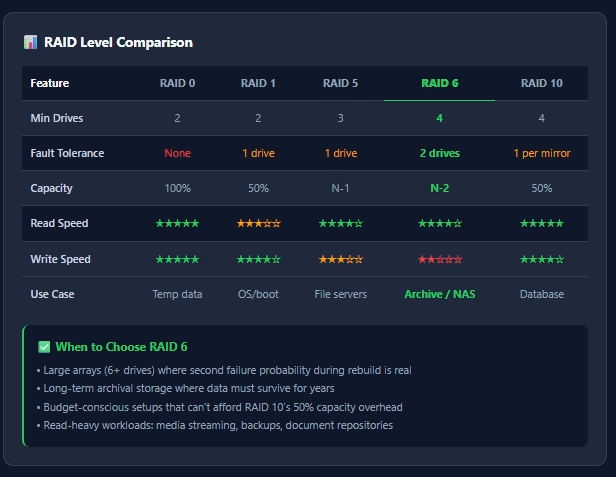
Below, I’ll break down exactly how RAID 6 works — the dual-parity mathematics, the P and Q parity calculation, and the rebuild process — using clear examples and the interactive infographic above.
What Is RAID 6?
RAID 6 (Redundant Array of Independent Disks, Level 6) is a block-level striping scheme with dual distributed parity. In plain English:
- Your data is split into blocks and striped across multiple drives
- Two independent parity blocks are calculated and distributed across the array
- The array can lose any two drives and still function without data loss
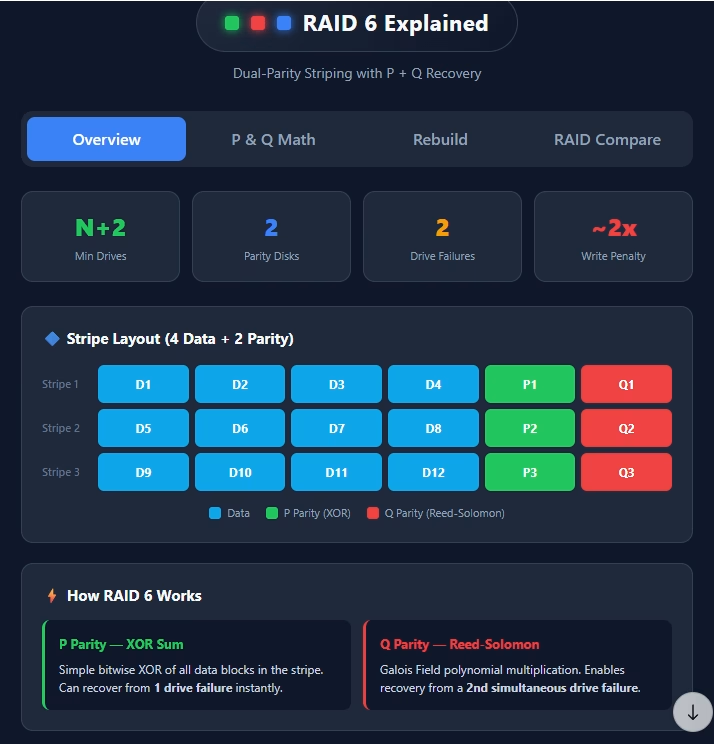
The Stripe Layout
In a typical RAID 6 array with 6 drives, each stripe looks like this:
┌─────────┬─────────┬─────────┬─────────┬─────────┬─────────┐
│   D1    │   D2    │   D3    │   D4    │   P1    │   Q1    │
│ (Data)  │ (Data)  │ (Data)  │ (Data)  │(XOR P)  │(GF Q)   │
└─────────┴─────────┴─────────┴─────────┴─────────┴─────────┘- D1–D4: Your actual data blocks
- P1: XOR parity (same as RAID 5)
- Q1: Reed-Solomon parity (the RAID 6 “secret sauce”)
The parity blocks rotate across drives stripe-by-stripe, so no single drive becomes a bottleneck.
The Two Parities: P and Q Explained
RAID 6’s power comes from having two independent equations for every stripe. This allows the controller to solve for two unknowns (two failed drives).
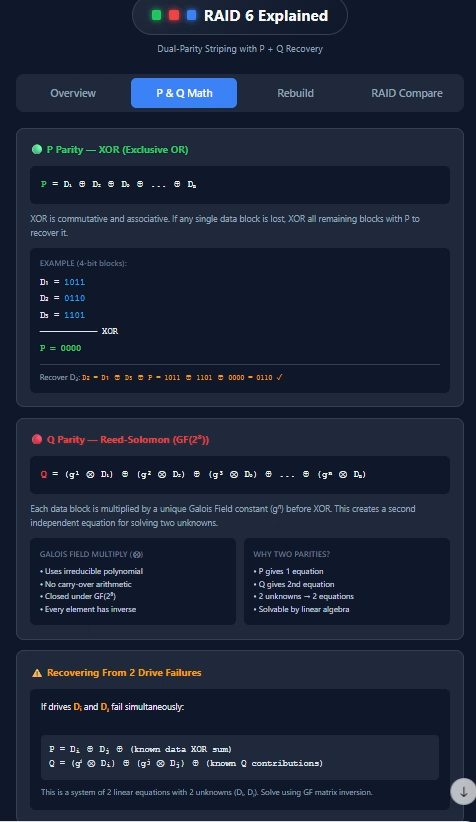
P Parity — Simple XOR
P is calculated exactly like RAID 5 parity — a bitwise XOR of all data blocks in the stripe:
P = D₁ ⊕ D₂ ⊕ D₃ ⊕ ... ⊕ DₙXOR has a beautiful property: if you XOR a value with itself, you get 0. If you XOR anything with 0, you get itself. This means:
If one drive fails, XOR all surviving data blocks with P, and you recover the missing block instantly.
Example:
D₁ = 1011
D₂ = 0110
D₃ = 1101
     ──── XOR
P  = 0000
If D₂ fails, recover it:
D₂ = D₁ ⊕ D₃ ⊕ P = 1011 ⊕ 1101 ⊕ 0000 = 0110 ✓This is fast, simple, and requires almost no CPU power. But it only solves one missing variable.
Q Parity — Reed-Solomon in Galois Field
Q is where RAID 6 gets mathematically interesting. It uses Galois Field arithmetic (specifically GF(2⁸)) to create a second independent equation.
Q = (g¹ ⊗ D₁) ⊕ (g² ⊗ D₂) ⊕ (g³ ⊗ D₃) ⊕ ... ⊕ (gⁿ ⊗ Dₙ)Where:
⊗= Galois Field multiplication (not standard multiplication!)g= a generator element in GF(2⁸)- Each data block gets multiplied by a unique power of
gbefore XOR
Why Galois Fields?
Standard arithmetic has a problem: multiplication can overflow, and division can produce fractions. In a Galois Field:
- Every operation stays within the field (0–255 for GF(2⁸))
- Every non-zero element has a multiplicative inverse
- No carry-over, no rounding errors — perfect for binary data
This creates a system of two linear equations:
Equation 1 (P):  D₁ ⊕ D₂ ⊕ D₃ = P
Equation 2 (Q):  g¹⊗D₁ ⊕ g²⊗D₂ ⊕ g³⊗D₃ = Q
With two equations and two unknowns, you can solve for any two missing drives.
Recovering From Two Drive Failures
This is RAID 6’s superpower. Let’s say drives D₂ and D₄ fail simultaneously.
From the surviving data, the controller knows:
P = D₂ ⊕ D₄ ⊕ (known XOR sum of D₁, D₃)
Q = (g²⊗D₂) ⊕ (g⁴⊗D₄) ⊕ (known Q contributions from D₁, D₃)
Rearrange:
D₂ ⊕ D₄ = P ⊕ (known sum)        → Equation A
g²⊗D₂ ⊕ g⁴⊗D₄ = Q ⊕ (known Q)    → Equation B
This is a solvable 2×2 linear system in GF(2⁸). The controller uses matrix inversion or substitution to recover both D₂ and D₄.
The CPU cost is higher than a single-drive rebuild, but your data is safe.
The Rebuild Process: Step by Step
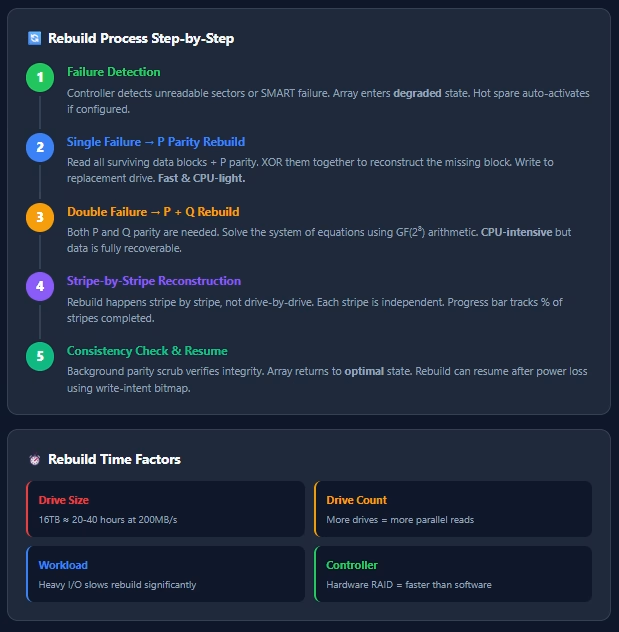
When a drive fails, RAID 6 follows a precise recovery sequence:
1. Failure Detection
The controller detects the failure via SMART alerts, unreadable sectors, or timeout. The array enters a degraded state. If a hot spare is configured, it activates automatically.
2. Single Failure → P Parity Rebuild
If only one drive failed, the rebuild is straightforward:
- Read all surviving data blocks + P parity from the stripe
- XOR them together
- Write the result to the replacement drive
This is fast and CPU-light — similar to RAID 5 rebuild speed.
3. Double Failure → P + Q Rebuild
If a second drive fails during the first rebuild (or simultaneously):
- The controller must use both P and Q
- It solves the GF(2⁸) equation system stripe by stripe
- This is CPU-intensive and slower, but data is fully recoverable
4. Stripe-by-Stripe Reconstruction
RAID 6 rebuilds stripe by stripe, not drive by drive. Each stripe is independent, which means:
- Rebuilds can be parallelized
- Progress is tracked as “% of stripes completed”
- If power is lost, a write-intent bitmap allows resumption
5. Consistency Check & Return to Optimal
After rebuild, a background parity scrub verifies all P and Q values. The array returns to optimal state.
RAID 6 vs. Other Levels
| Feature | RAID 5 | RAID 6 | RAID 10 |
|---|---|---|---|
| Min Drives | 3 | 4 | 4 |
| Fault Tolerance | 1 drive | 2 drives | 1 per mirror |
| Usable Capacity | N-1 | N-2 | 50% |
| Write Penalty | 4x | 6x | 2x |
| Best For | File servers | Archive / NAS | Databases |
When to Choose RAID 6
✅ Large arrays (6+ drives) — The larger the array, the higher the chance of a second failure during rebuild
✅ Long-term archival — Backups, media libraries, cold storage
✅ Budget-conscious setups — You lose 2 drives worth of capacity, not 50% like RAID 10
✅ Read-heavy workloads — Media streaming, document repositories, backups
When NOT to Choose RAID 6
❌ Write-heavy databases — The 6x write penalty hurts transactional performance
❌ Small arrays (4 drives) — You’re losing 50% capacity; consider RAID 10 instead
❌ Low-latency requirements — Parity calculation adds latency vs. mirroring
The Bottom Line
RAID 6 is the safety net of the storage world. It trades some write performance and two drives’ worth of capacity for the ability to survive two simultaneous failures — a scenario that’s increasingly likely as drive sizes grow and rebuild times stretch into days.
If you’re building a NAS, backup server, or any system where data survival matters more than raw write speed, RAID 6 belongs in your architecture.
Remember: RAID is not a backup. It protects against drive failure, not ransomware, user error, or fires. Always maintain off-site copies for critical data.
Got questions about RAID 6 configuration, hardware vs. software RAID 6, or sizing your array? Drop a comment below.
