This article covers the initial configuration for the PowerStore T model only. Below are some guidelines to keep in mind while configuring a multi-appliance PowerStore T cluster for the first time.
- The final cluster size cannot exceed four appliances.
- You can only select healthy and uninitialized appliances.
- Each appliance is configured synchronously starting with the primary appliance.
- Only the primary appliance can be in unified mode if selected.
- All additional appliances are automatically rebooted into a block-optimized configuration when added into a cluster.
- The appliances must be able to communicate with each other with untagged VLAN and IPv6 addresses on the bonded interfaces of the PowerStore system.
- The system bonds of all appliances should be on the same native VLAN.
Dell PowerStore Unified Cluster
When setting up a Powerstore T cluster for the first time, it needs to be checked if file services are needed. Once the array/cluster is set up to be unified or Block only. There is no going back. Hence, it’s advisable that when in doubt select a unified cluster.
Also, keep in mind that, (At the time of writing this article) when you select a unified cluster, then there are some hardware resources dedicated to the file as well. It does not matter if you are going to use it or not.
Dell PowerStore Initial Configuration: Management Network Requirement
Management Network as a native VLAN is required.
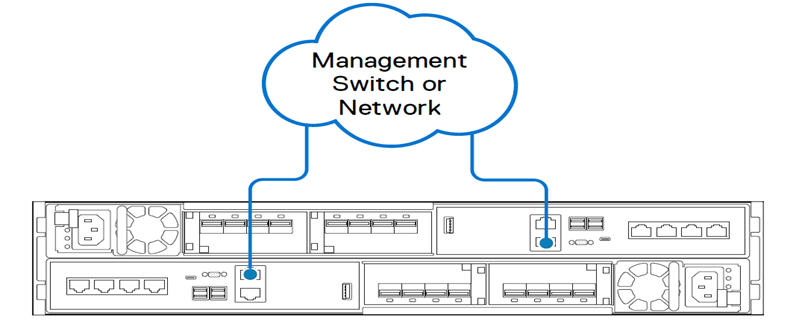
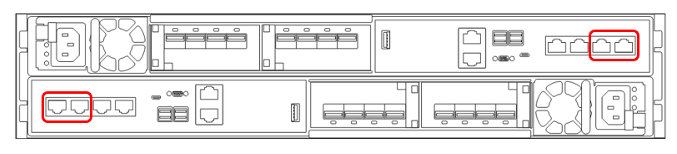
Connect the network cable on Node A MGMT Port to Management Network Switch 1.
Connect the network cable on Node B MGMT Port to Management Network Switch 2.
Note: If you have more than one appliance then you need to connect all the nodes as described above to the management network.
Dell PowerStore Initial Configuration: Service Network (optional)
2 * Services Ports per Appliance connected to Management Network.
Service Ports are used for out-of-band connection when re-initialization is required. This is not part of a standard installation but may help a lot as everybody is remote. As Powerstore uses static IPs, each appliance needs a separate private/isolated VLA which is available on the second interface of a management VM to run ipmitool.

Dell PowerStore Initial Configuration: Storage Network
4 * Storage Network (10 Gbe optical) is required for 1 Powerstore appliance configuration. If there are 4 appliances, then 4 * 4 connections are required.
Connect the network cables on Node A:
- Port 0 of the embedded module connects to switch 1.
- Port 1 of the embedded module connects to switch 2.
Connect the network cables on Node B:
- Port 0 of the embedded module connects to Switch 2.
- Port 1 of the embedded module connects to Switch 1.
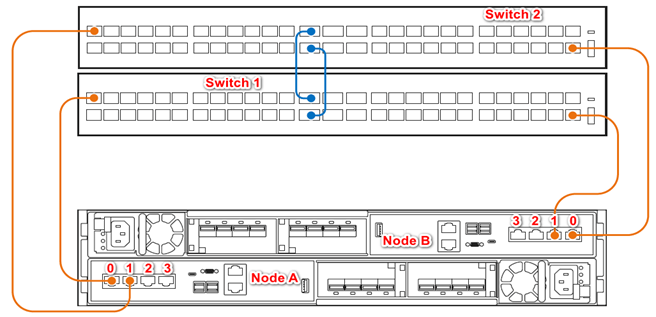
Note: For FC-only block-optimized PowerStore T model configurations: You can choose to skip the above steps if you do not plan on configuring or using the replication, import, file, or iSCSI features.
Dell PowerStore Initial Configuration: Tagged VLAN Requirement
Tagged VLANs are required for iSCSI and Replication. One or more VLANs are required for NAS access.
Dell PowerStore Initial Configuration: System Bond Creation Requirement
PowerStore T model system contains a system bond by default on the first two ports of the embedded module 4-port card. PowerStore 500 model does not contain a system bond where a 4-port card is not present.
This system bond provides high availability and potentially increased throughput for iSCSI, external storage import, data migration, and intra-cluster traffic. If link aggregation is not created across the two physical Ethernet switches for this bond, the bond automatically enters an active/passive state.
The system bonds of all appliances should be on the same native VLAN.

Dell PowerStore Initial Configuration: IP Requirement
As stated before, Powerstore supports up to 4 appliances and each appliance has 2 nodes. The listed requirements are per appliance.It is recommended that you reserve extra IP addresses to accommodate adding more appliances in the future.
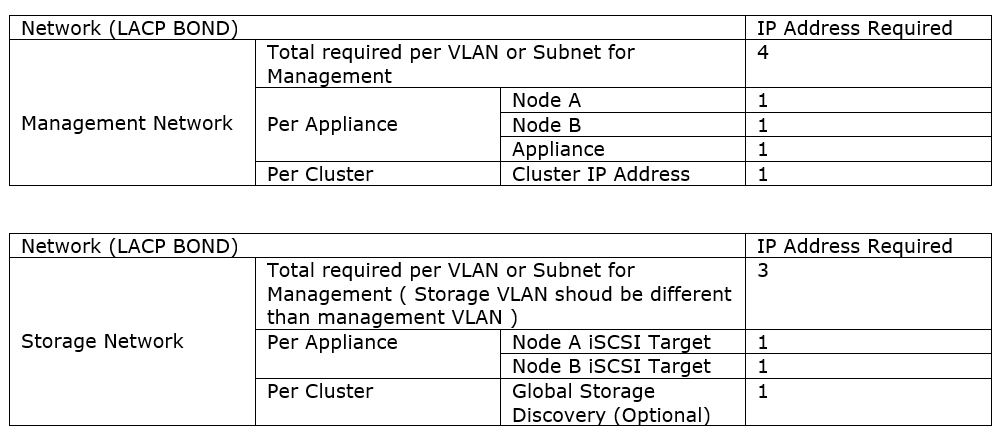
NOTE: More IP’s may be required for storage network if more ports are used for Replication, NAS etc.
At this stage the PowerStore system should already be discovered using one of the two methods mentioned below:
- Discover PowerStore system using the Direct Connection
- Discover PowerStore system using Discovery Utility
If you have successfully discovered the Dell PowerStore appliance. Then please proceed with the Initial Configuration Wizard.
Dell PowerStore Initial Configuration: Step by Step
After you log in, the Initial Configuration Wizard is shown, and it only appears during your first login.
Step 1
At your first login, you must change the default password to a new password as shown below.
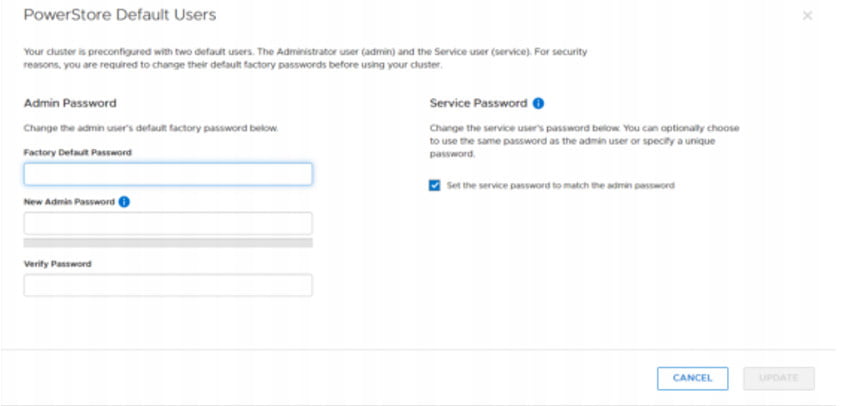
The service password is set to match the admin password by default, but you can optionally change it to a different password. The service password is used for the service user account which allows users to perform service operations and other troubleshooting-related functions. The service user can access the console of the PowerStore system through the service port or through SSH access.
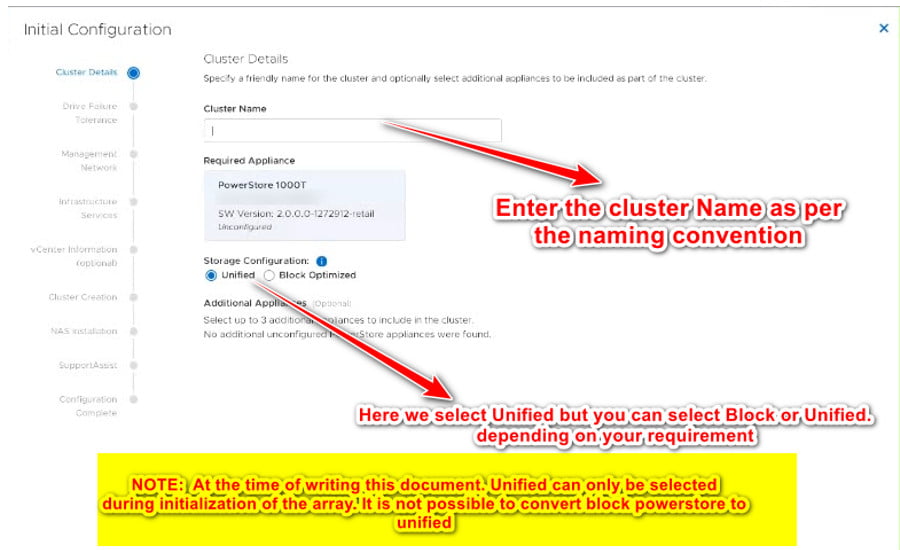
Step 2
Enter the Cluster Name as per the naming convention and select Unified as we are deploying a unified Powerstore and click next. Please select Block optimized or Unified as per your requirement.
If you select block optimized here on this screen. Then some steps performed later in the wizard may not be applicable to you.
NOTE: Block-optimized Powerstore cant be converted to Unified Later.
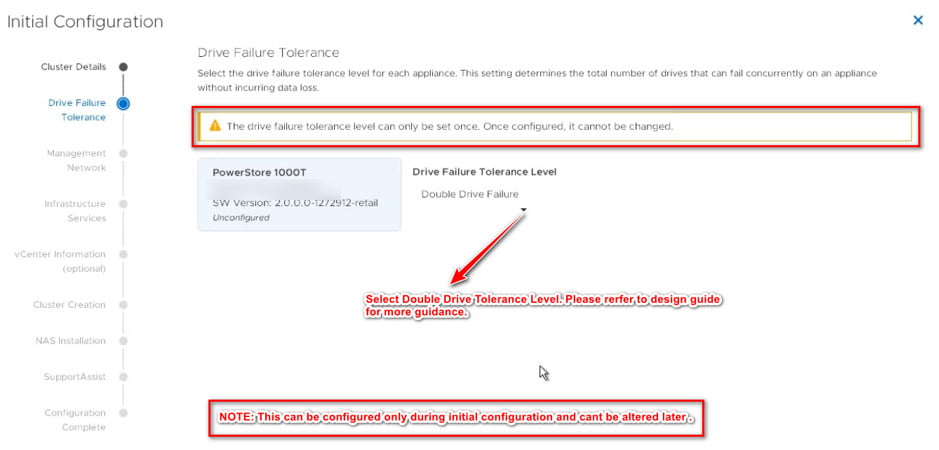
Step 3
Click on the carrot and select Single or Double Drive Failure. I have selected Double Drive Failure protection here but you can select either of the options. However, please do note that if you select the Double Drive Failure option then usable capacity will decrease as more drives will be used as spare drives.
Single Drive Failure vs. Double Drive Failure
Single Drive Failure
- Default value
- Single parity protection is used within each Resiliency Set for user data
- Up to one simultaneous drive failure per Resiliency Set without encountering DU/DL
Double Drive Failure
- DRE dual parity protection is used within each Resiliency Set for user data
- Up to two simultaneous drive failures per Resiliency Set without encountering DU/DL
- Parity overhead for dual parity DRE is higher than single parity for smaller configurations.
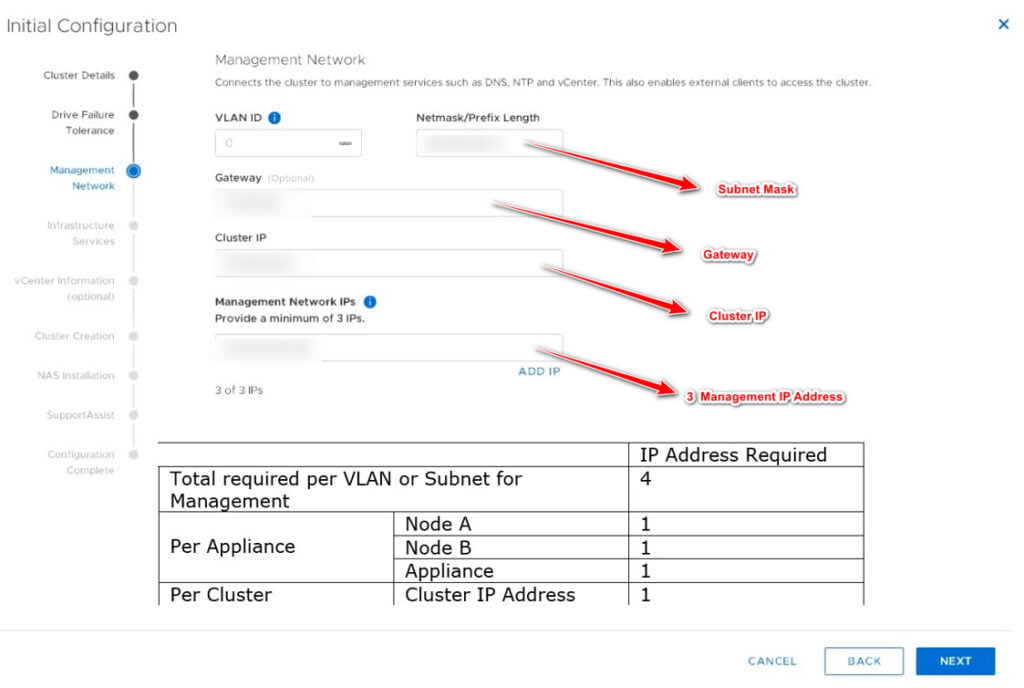
Step 4
Enter the Management IP details as mentioned in the image below.
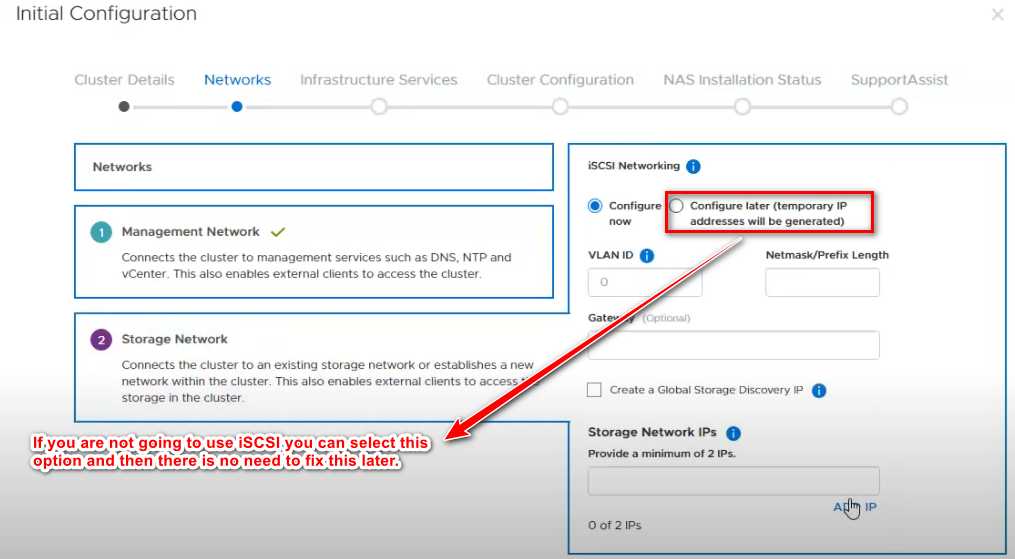
In the newer version of Powerstore, the initial configuration screen looks slightly different. Hence, I have included the screenshot of the new management/Storage network screen as well. The storage network can be defined based on whether you are going to use iSCSI or not.
If You are not going to use iSCSI as your storage network then select “configure later” and temporary IP addresses will be generated and will be used to complete this step. There is no need for you to get the correct IPs from your network team.
However, if you are going to use iSCSI as your preferred storage network. Then you will require at least 2 IP addresses to complete this step. It is also recommended that you create a separate VLAN for iSCSI.
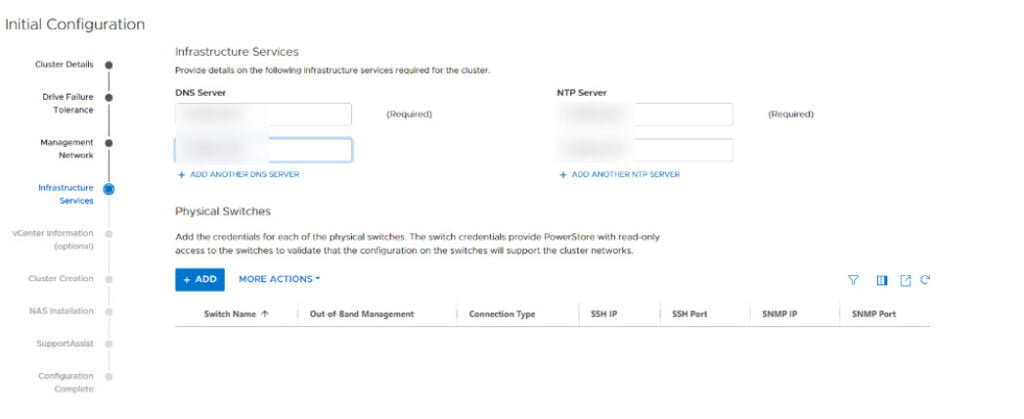
Step 5
Please enter the DNS and NTP server IP details on this screen and click on next.
Step 6
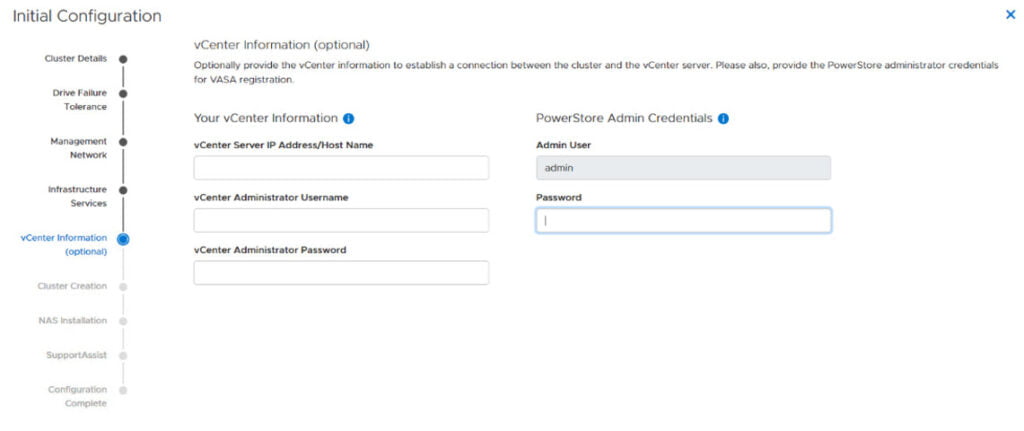
This is an optional screen and can be skipped. If vCenter needs to be linked to PowerStore it can be done later as well. Here we are skipping it as we don’t have vCenter. Click Next.
Step 7
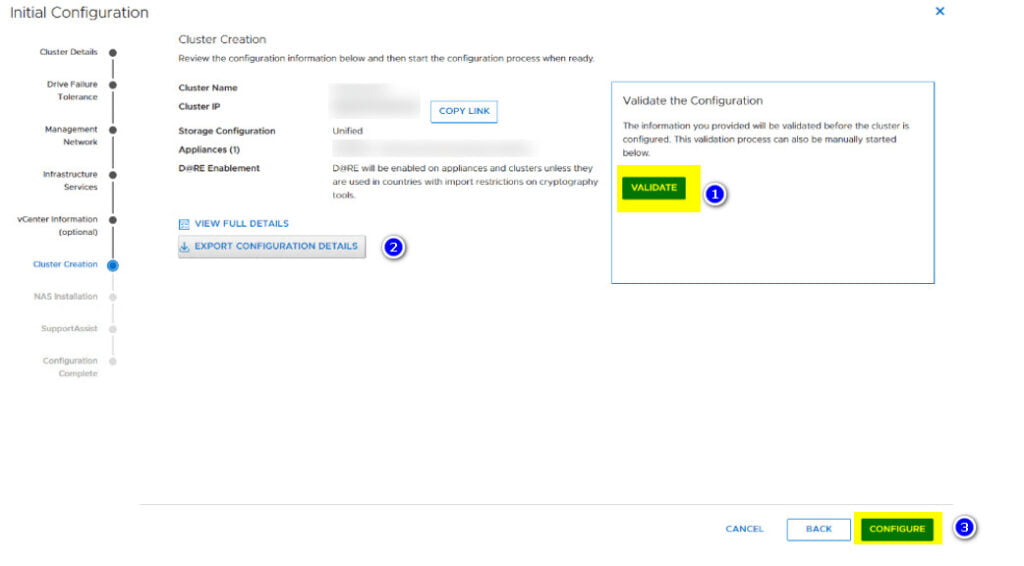
On this screen, the PowerStore cluster will be created.
- Click on View Full Details to validate all the selections made on the previous screen.
- If needed export configuration details as well.
- Click on Validate button to verify the PowerStore Configuration. ( Note: You may see warnings if VLANS or IPs have not been configured correctly).
- Click on configure to start the cluster creation process
Step 8
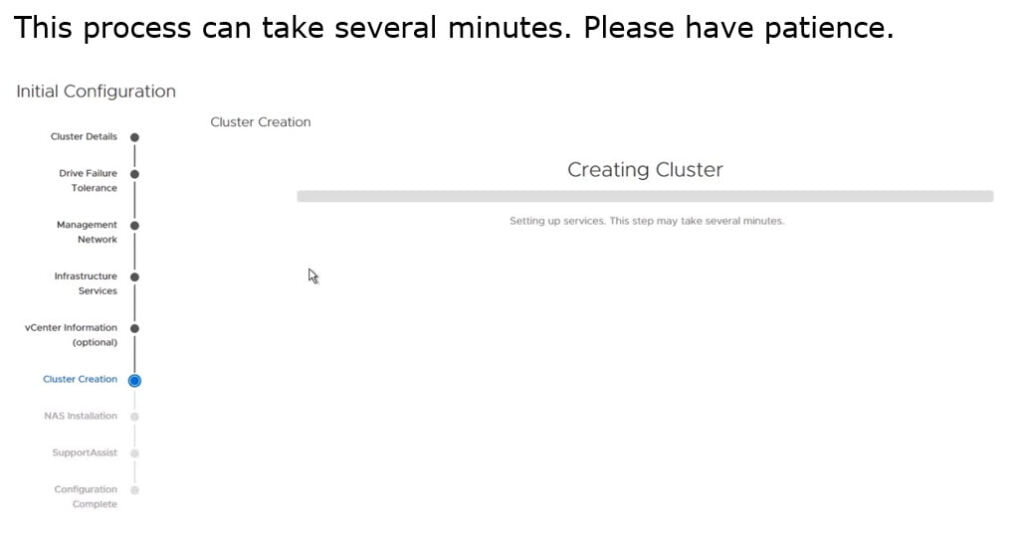
This process can take several minutes. Please have patience.
Step 9
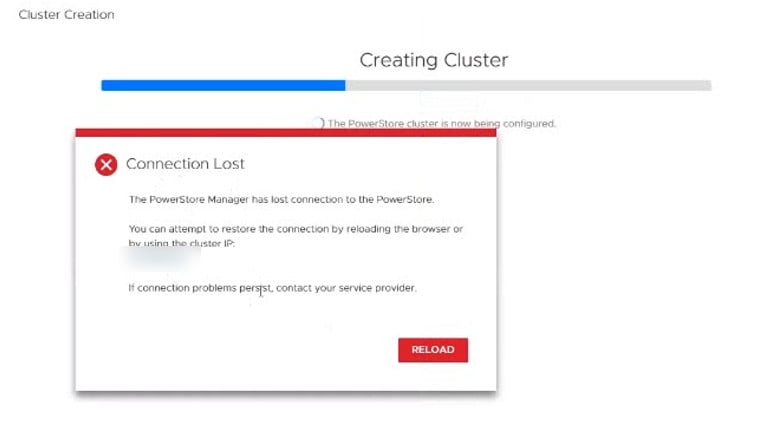
A cluster has been created and a new Cluster IP has been assigned. This will lead to PowerStore Manager disconnection. Just relaunch the PowerStore Manager with the new Cluster IP.
NOTE: You will lose access to the GUI as the new management IP will be configured. Please relaunch the GUI using the cluster IP as specified on this screen.
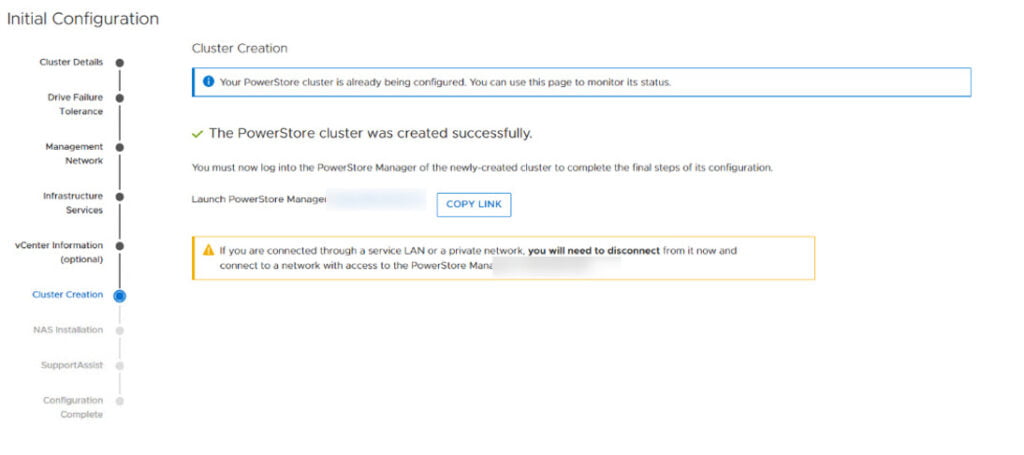
Step 10
- After logging in again to PowerStore Manager, the initial configuration wizard confirms that the cluster has been created successfully as shown below.
- Relaunch Power Manager using the new Cluster IP as specified below.
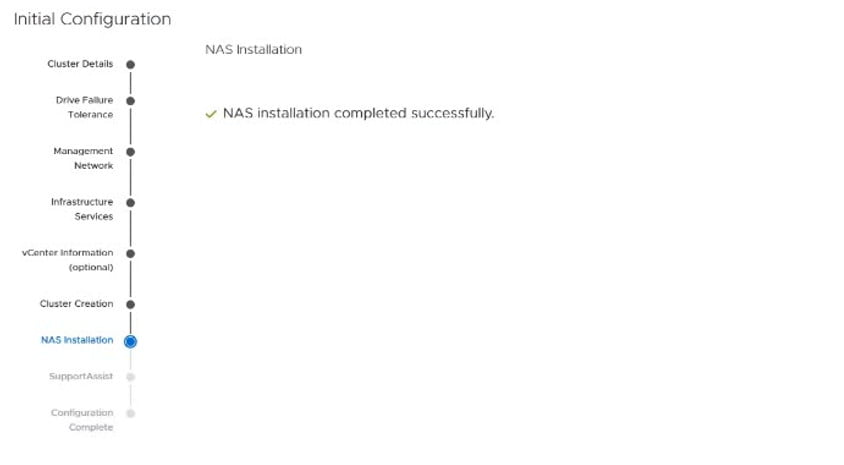
Step 11
The initial Configuration wizard will proceed to install SD-NAS automatically post cluster creation as we had selected unified storage earlier.
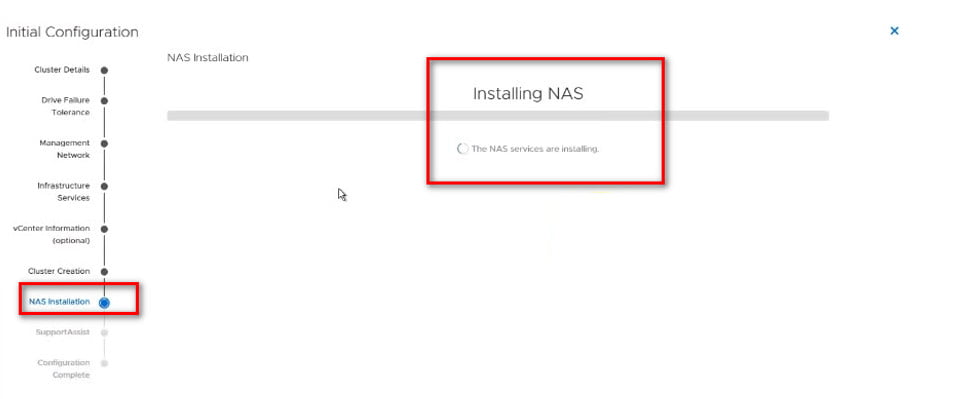
It may take some time before completing the NAS installation.
Step 12
Please read the support and license agreement and select the checkbox to agree with the license agreement.
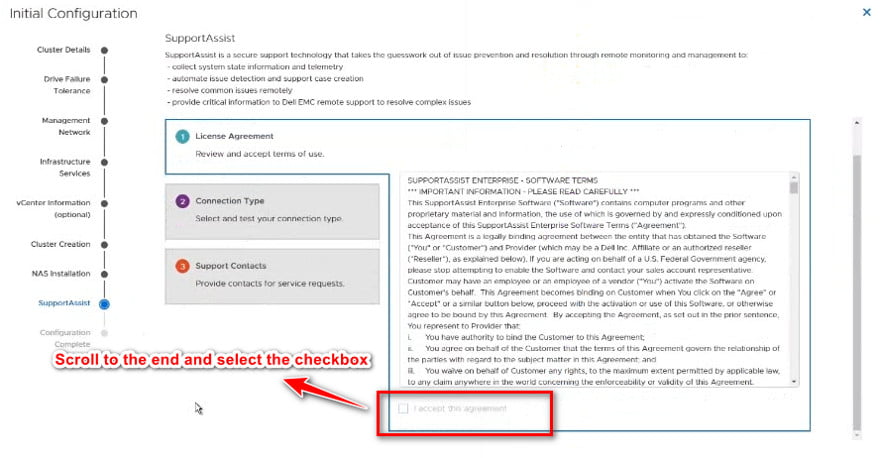
Click on the Skip button on the above screen and then Skip again in the Popup to proceed. I am skipping this screen as I don’t have all the details to configure SupportAssist right now. If you do, please proceed with this step.

NOTE: SupportAssist can be configured here on this screen or it can be configured later from settings in PowerStore Manager. I have create a separate post to configure SupportAssist on PowerStore as well.
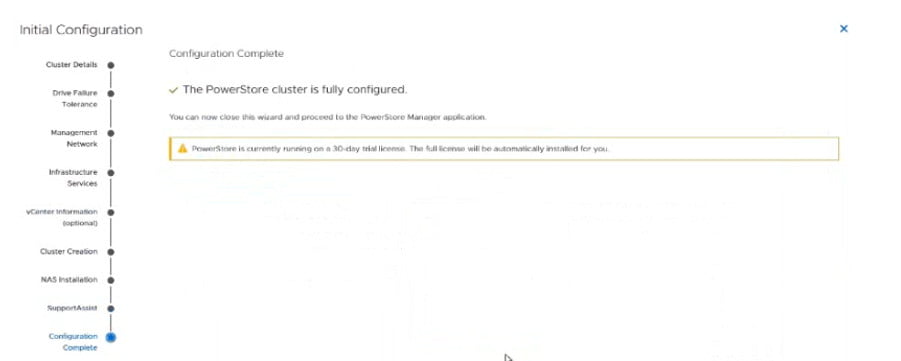
Step 13
At this stage, Initial Configuration Wizard is completed and PowerStore Manager can be relaunched to manage the array.