In this article, we will see how to add an existing and new volume to the volume group in PowerStore using PowerStore Manager. The volume group feature in Dell PowerStore allows multiple volumes to be grouped together so a common action like snapshot/replication can be performed on them.
PowerStore Volume Group Limitations
It is important to note that all volumes in a volume group should belong to the same appliance, otherwise while adding the volume to the volume group you will get an error as shown below:

If a volume group does not have a protection policy and is not write-order-consistent, you can add a volume that has a protection policy to that volume group.
However, be aware of some restrictions that apply when adding existing volumes to volume groups:
- If the volume group has a protection policy, the volume that you are adding cannot have a protection policy already in place.
- If the volume group has a protection policy and is write-order-consistent, you cannot add a volume that has a protection policy to that volume group.
- If you add a volume to the volume group that has existing snapshots, you cannot use those volume group snapshots for refresh or restore operations.
- If you must restore or refresh the volume group from a snapshot that was taken before the new volume was added, you must remove the new volume.
- Restore and refresh operations require that the volume group membership match the membership that existed when the snapshot was taken.
Add existing volumes to a volume group using PowerStore Manager – Step by Step
Step 1
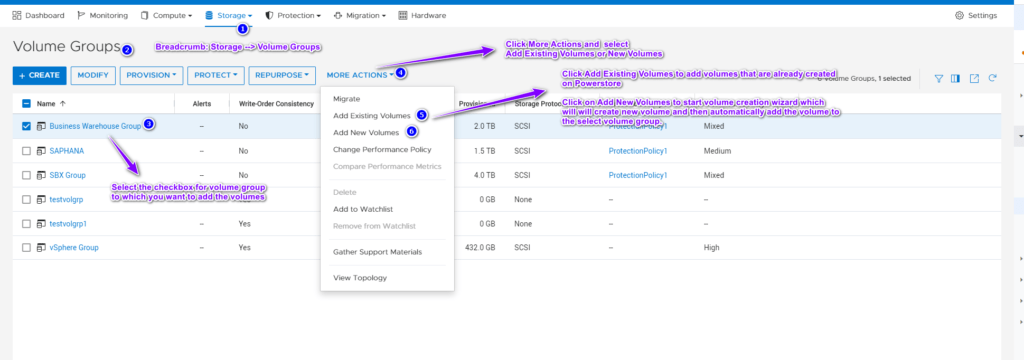
- Login to PowerStore Manager
- Navigate to Storage, Volume groups
- Select the checkbox next to the Volume Group to which you want to add the volumes.
- Click on More Actions
- Click on Add Existing Volumes

NOTE: WordPress is scaling down the images. So, if you would like to read the text on the image. Then, please zoom the image or page itself.
Step 2
- Select the volumes you wish to Add to the Volume Group.
- Click Apply

NOTE: All Volumes should be on the same appliance and should have no protection policy. Please refer to the limitation section for more details.
The Volume Group to which these volumes are added is protected by a Protection Policy so an additional screen appears as shown below.

Step 3
The success message is displayed after step 2 is completed and at this stage, volumes are successfully added to the volume group.

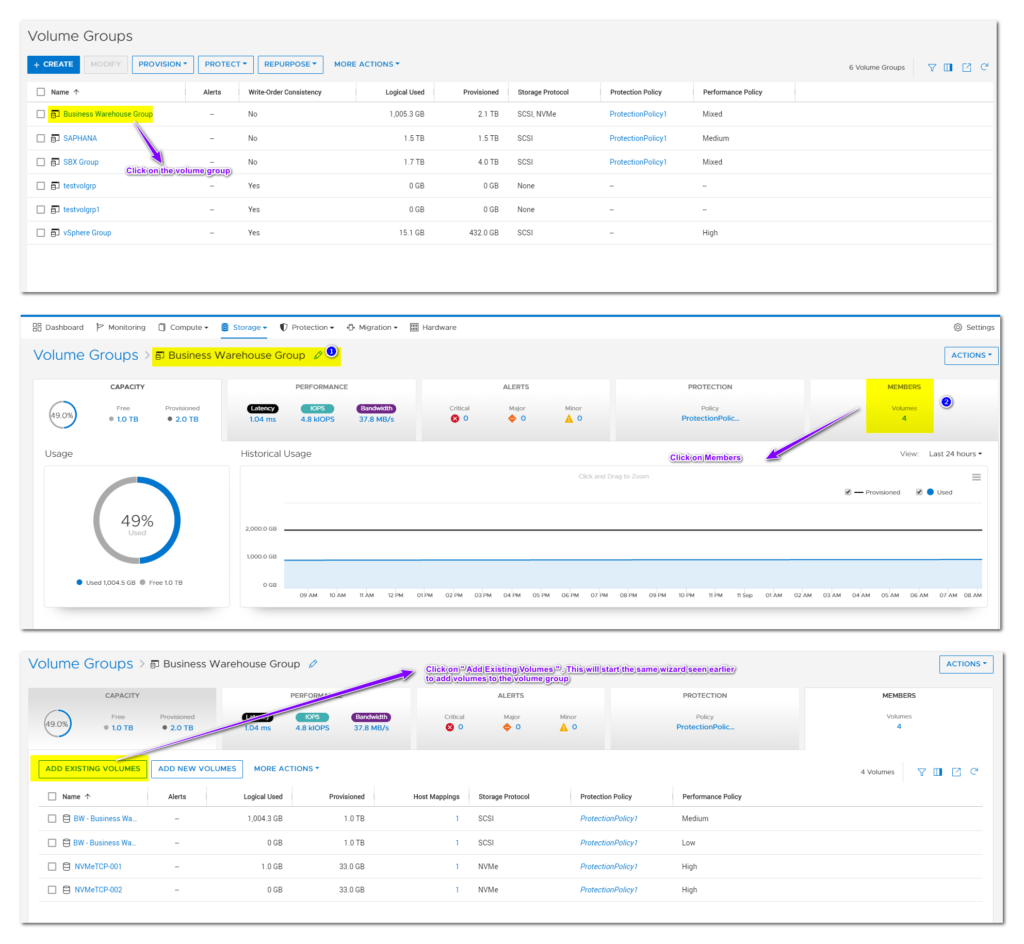
You can click on the volume group and then click on members to validate the volumes added to verify the operation.

Alternate Track to Add Existing Volumes to the Volume Group
- Click on Storage and Click on Volume Groups
- Click the Volume Group (Business Warehouse Group in my case) to which volumes need to be added
- Click on Members
- Click on Add Existing Volumes
- Wizard to Add existing volumes to the volume group will be initiated

